Webサイトやアプリなどでよく見るカードベースのデザイン。
そんなカードベースデザインのレイアウトをAndroidで実装する方法を紹介します。
カードデザインを使うためには
カードベースのデザインを使うためにすることは2つだけです。
- 依存関係の追加
- CardViewを追加
依存関係を追加
「build.gradle(Module: app)」ファイルを開いて、次の依存関係を追加します。
dependencies {
    ・・・
    implementation "androidx.cardview:cardview:1.0.0"
}最新のバージョンは、AndroidXのリリースページで確認することができます。
CardViewを追加
レイアウトファイルを開いて、CardViewを追加します。
<?xml version="1.0" encoding="utf-8"?>
<LinearLayout xmlns:android="http://schemas.android.com/apk/res/android"
    xmlns:tools="http://schemas.android.com/tools"
    android:layout_width="match_parent"
    android:layout_height="match_parent"
    tools:context=".MainActivity"
    >

    <androidx.cardview.widget.CardView
        android:layout_width="match_parent"
        android:layout_height="wrap_content"
        >

        <TextView
            android:layout_width="wrap_content"
            android:layout_height="wrap_content"
            android:text="Hello CardView!"
            />

    </androidx.cardview.widget.CardView>

</LinearLayout>
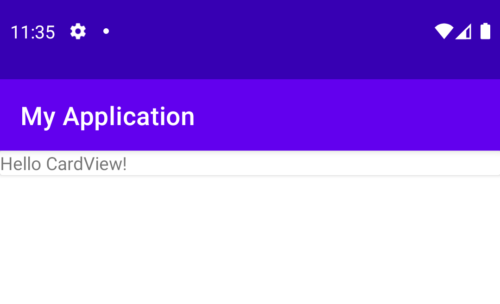
これでカードベースのレイアウトを表示することができます。
上のコードでは、CardView内に配置したTextViewがカードデザインになります。

CardViewについて
CardViewは、FrameLayoutを継承しているため、画面のレイアウトを決めるビューグループになります。
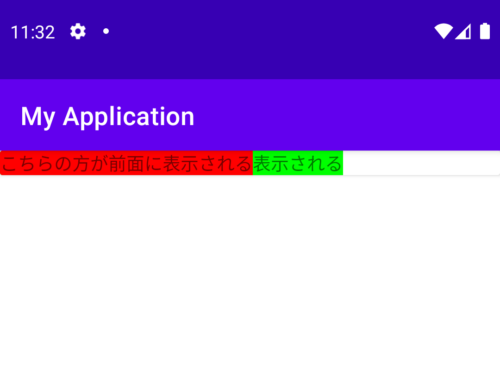
FrameLayoutと同様に、CardView内に複数のビューを配置すれば、ビューは重ねて表示されます。
以下のコードは、CardView内に2つのTextViewを配置した例です。 最後に追加されたビューが画面の最も前面に表示されます。
<?xml version="1.0" encoding="utf-8"?>
<LinearLayout xmlns:android="http://schemas.android.com/apk/res/android"
    xmlns:tools="http://schemas.android.com/tools"
    android:layout_width="match_parent"
    android:layout_height="match_parent"
    tools:context=".MainActivity"
    >

    <androidx.cardview.widget.CardView
        android:layout_width="match_parent"
        android:layout_height="wrap_content"
        >

        <TextView
            android:layout_width="wrap_content"
            android:layout_height="wrap_content"
            android:text="始めに追加したビューは背面に表示される"
            android:background="@color/green"
            />

        <TextView
            android:layout_width="wrap_content"
            android:layout_height="wrap_content"
            android:text="こちらの方が前面に表示される"
            android:background="@color/red"
            />

    </androidx.cardview.widget.CardView>

</LinearLayout>
CardViewのプロパティ
CardViewには、以下のようなプロパティがあります。
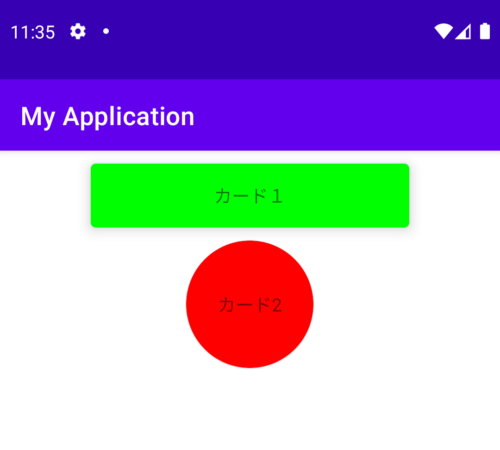
- cardBackgroundColor:カードの背景色の変更
- cardCornerRadius:カードの丸みの変更
- cardElevation:カードの高度の変更(高くするほど影が濃くなる)
CardViewの縦横のサイズを同じにして、カードの丸みをサイズの半分にすれば円を作ることもできます。
<?xml version="1.0" encoding="utf-8"?>
<LinearLayout xmlns:android="http://schemas.android.com/apk/res/android"
    xmlns:tools="http://schemas.android.com/tools"
    xmlns:app="http://schemas.android.com/apk/res-auto"
    android:layout_width="match_parent"
    android:layout_height="match_parent"
    android:orientation="vertical"
    tools:context=".MainActivity"
    >

    <androidx.cardview.widget.CardView
        android:layout_gravity="center"
        android:layout_width="250dp"
        android:layout_height="50dp"
        android:layout_marginTop="10dp"
        app:cardBackgroundColor="@color/green"
        app:cardCornerRadius="4dp"
        app:cardElevation="8dp"
        >

        <TextView
            android:layout_gravity="center"
            android:layout_width="wrap_content"
            android:layout_height="wrap_content"
            android:text="カード1"
            />

    </androidx.cardview.widget.CardView>

    <androidx.cardview.widget.CardView
        android:layout_gravity="center"
        android:layout_width="100dp"
        android:layout_height="100dp"
        android:layout_marginTop="10dp"
        app:cardBackgroundColor="@color/red"
        app:cardCornerRadius="50dp"
        app:cardElevation="1dp"
        >

        <TextView
            android:layout_gravity="center"
            android:layout_width="wrap_content"
            android:layout_height="wrap_content"
            android:text="カード2"
            />

    </androidx.cardview.widget.CardView>

</LinearLayout>
CardViewは、Android5.0(APIレベル21)前後で動作が異なるため注意が必要です。詳しくは、CardView Androidデベロッパーを参照してください。
まとめ
カードベースのレイアウトのまとめです。
- 依存関係を追加する。
- カードデザインにしたいレイアウトにCardViewを追加する。
- CardView内に複数のビューを配置すると重なって表示される。
- Android5.0(APIレベル21)前後で動作が異なるため注意が必要。
- CardViewは、RecyclerViewと一緒に使うとよさそう。
カードのデザインは、Googleのマテリアルデザインサイトが参考になります。
Android開発のためのオススメ書籍
リンク
設計についてのオススメの書籍


